Help, Tips and Ideas for Printing Certificates
, Incentives Sheets, and Awards:How to use the new certificate maker:
2025 update changes:
- You can hold the 'ctrl' button and select multiple items to edit or drag them together.
- You can use your keyboard arrows to make fine position adjustments.
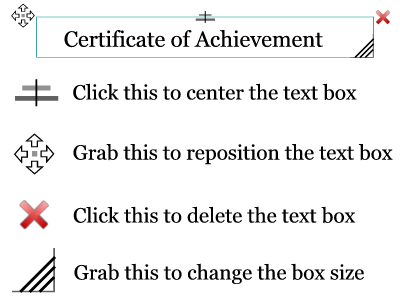
- You can drag from anywhere on the textbox, but for ease of use, there is a drag icon at the top left.
Step 1: Choose your paper size and layout. You can change these later but it will save you time in setting up your cetificate. If you are adding images, you might want to do that as well (see step 4 for repositioning and resizing images.)
Step 2: Edit the text. It will save you time if you edit the text first and then make font and layout changes. So just add everything and then start moving them around. You can delete text boxes or add new ones as needed.
Step 3: Choose your font. If you select one text box and then change the font, it will change just that text box. If you haven't selected any text, the font will change for all of the text on the certificate.
Step 4: Edit the layout. Below is an illustration of the controls on the text boxes and images you add. You can drag the text around, resize the boxes and center them in the frame.

Step 5: Print! If you are happy with everything, click the print button. In most browsers, you will get a preview and you can adjust the margins to make sure everything is centered and looks just the way you'd like.
There are 2 options for export, 'Print' and 'Download PNG'. This site is designed to make printable certificates and the new certificate maker should print high quality certificates for you. The download PNG will generate an image of greatly reduced quality but it should be good enough to email to someone for review or simple reference. It is not meant to be awarded to the recipient.
Nothing happens when you click 'Download PNG': The download option will open a new browser tab and is often blocked by pop-up blockers. You should see some warning either at the top right or bottom left of the browser. If you allow pop-ups on 123 Certificates, the download option should work for you from that point forward.
With the new certificate maker, one border loads at a time. This means I can provide higher quality images and decrease the load time for the maker. However, this means that when you change to a new border or new color, you may need to wait a few seconds before you will see it. (The files are about 200-250kB each.) Once the new border has loaded, you should be able to flip through the different borders rather smoothly.
If you are unsure about which certificate you'd like to make. it's best to check the category preview page (link is provided above), rather than click through 25 or up to 120 certificate borders.
The certificate border is wrong: This is a new version of the certificate maker. If you are following old links or old bookmarks, please see the category preview page and click on the certificate template you'd like to make. That should pull up the matching certificate. If it doesn't please send me an email and I'll fix the problem as soon as I can.
The certificate border isn't changing: Each border loads one at a time. The maker will lazy load the next 3 borders, but it may take a couple seconds to load the next ones. See the section above 'Changing the Border' for more information.
The application seems to be frozen: Try clicking on the layout and paper size buttons a couple times and it should correct. The new version is designed to be responsive, but internet speed and server responsiveness also play a role. I believe the issue is limited to some mobile devices at this time.
The certificate isn't centered: First make sure you have chosen the correct paper size. Second, in the browser tools menu, look for 'page settings' and then 'margins'. This is best done in a print preview window, but decrease the top, bottom and side margins to 6 or 7 and try again.
The page information/URL is printing: This is a browser setting and you need to turn this off in the printer or page settings. Go into your Web browser's tools menu -> page settings -> header and footer. Change the information to 'blank' or 'none' and that should fix the problem.
Can I save the data?: Unfortunately, no. The site is designed for printing certificates, quickly and easily. I don't provide user accounts and so I can't save user specific data. Once you close the browser window or visit another page, the information and work will be gone. You will need to start over.
If you have any other issues, please send me an email (admin @ 123certificates.com), and I will do my best to fix it as soon as possible.
Help and tips for using the older certificate maker
Once the certificate has been made, click on "file" at the top left of the screen. Choose "page settings" from the drop down menu. A new window will open. From there, you should see a tab that says "header/footer" and maybe "margins." Click on that tab and then erase all the information in the header and footer fields. Then the headers and footers won't print on your certificates.
Once you've made your certificate and before you hit print, go to 'file' and then 'page settings.' Check the margins and decrease the bottom margin. If the margins are too big, there won't be enough printable area, and the text might get pushed to the second page.
After clicking print, a print window should appear. You should see an option for "zoom." If you click on this then you can enlarge or reduce the size the file is printed. Play around with different percentages until you get the size you desire.
If you want to leave a field blank, you can copy the following html code below and place it in any field:
Alternatively, you can make a line where you can write the name or sign the certificate by typing in an extended underbar like this: ___________
You'll need to check your printer setting from the print window. The option not to have images print may be checked. After you hit print, you will get a pop-up print window. At the top right, there should be a 'printer properties' button. Click on that button and look through the tabs for the option 'don't print background images' or something to that effect. Unclick that option.
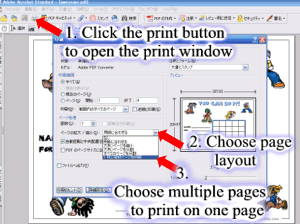
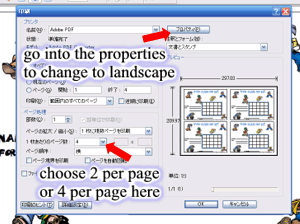
Incentives sheets have 4 pages so you can print them up to 4 per page:


The incentives pages are set up to print one large sheet per page but you can print multiple pages on one page by following the directions in the images above. You can have just 2 per page using the same technique. I thought this would be helpful and save some paper for people with larger classes.
Any other printing questions or problems please let me know - admin@123certificates.com .

You are free to use any resource from this site as an end user. You may not redistribute, copy, modify, transfer, transmit, repackage, charge for or sell any of the materials from this site. 123Certificates.com reserves the right to terminate or make changes to this agreement for any reason and without notice.
Copyright © 2006 - 2025 123 Certificates | restrictions | privacy | about

